Showing posts with label Blog Hop-Promotional. Show all posts

Sunday, October 18, 2020

Core Catalog New Product Blog Hop!

Welcome to our BLOG HOP!
Today, my creative Close to my
Heart consultant friends and I
are sharing what we've created
using NEW PRODUCTS
from our beautiful 100 page
annual CORE PRODUCTS catalog!


If you've just arrived here from
then you are on the correct path.


I hope you are inspired by the two standard-size cards
I created using the following NEW core products:

D1947 From the Funny Farm stamp set
Z3779 Wishing You Everything stamp set (+ thin cuts)
X8016B Party Time paper packet
X8016C Party Time coordinating cardstock
X8017 Wood Grain paper packet
Z3850 Pink Acrylic Hearts
Z3804 Yellow Acrylic Stars

The "Happy Birthday" sentiments are not
from a stamp set, they are cut from zips strips
included in the Party Time paper packet!

Now you can continue on with the blog hop
and be inspired by more creativity using
new core catalog products by visiting 

Monday, July 20, 2020

*Happiest Place* Blog Hop!

Welcome to our BLOG HOP!
Today, my creative Close to my
Heart consultant friends and I
are sharing what we've created
using the HAPPIEST PLACE
collection that includes beautiful
patterned papers (12 designs!),
silver foil patterned cardstock,
a sticker sheet, a stamp set,
cricut cuts, and black 
acrylic shapes!


If you just arrived here from
then you are on the right track.


Today I'm sharing a card I made that features
an old card-making trend, that I've started to notice
is making a comeback... the 8" x 3.5" card size!
(also known as a "slimline" card).
One of the things I love about making cards this
size is that they can so easily be mailed in a 
business-sized envelope, which adds an extra
element of surprise for the recipient of this 
kind of "happy mail."

In addition to the Happiest Place Stamp set and Thin Cuts
(CC7206) that I used to stamp the balloon and hearts inside
the balloon, I also used the Magical Alphabet (D1937) and
Little Buddies (C1856) stamp sets, as well.
Ink colors I used are Archival Black and Lagoon.
Cardstock colors include a little bit of Black, Canary, Candy
Apple, and Mink, alongside a striped print and a strip of
holographic-star printed cardstock (Canary) from the
Happiest Place paper collection.


Now you can continue on with the blog hop
and be inspired by more creativity using this 
collection by visiting MISS CARRIE's BLOG next!


Saturday, June 20, 2020

*Brushed* Blog Hop!

Welcome to our BLOG HOP!
Today, my creative Close to my Heart
 consultant friends and I
are sharing what we've created
using the "Bring Back my Pack"
BRUSHED special paper
collection and stamp sets!


If you just arrived here from
then you are on the right track.


I absolutely LOVE the beautifully vibrant color
combination options afforded by this updated paper collection!
To make these five standard-sized cards,
I used Archival Black, Canary, Green Apple, Lagoon, 
Pixie, and Smoothie ink pads. If you look closely, you might
notice that I included a little bit of (black) heat embossing
on the "Dream Big" card. I also "stamped on vellum" 
the large black butterfly on the "Life is Beautiful" card.
I used the instruction sheet from the Aurora Cardmaking
Workshop Kit (G1205) as my design inspiration for four of
the cards (as you can see from the images shown below).
I really love that our workshop kit instructions can be
utilized so easily with other papers and stamp sets. I love the creative process of tweaking the designs a little, so they can work with other materials, as I have demonstrated below.


The 5th and final card design (shown above) was 
inspired
by a square-shaped card I found on Pinterest that was
designed by Jody Gustafson back in August of 2014.
Thank you Jody for the creative inspiration!

Now you can continue on with the blog hop
and be inspired by more creativity using this 
collection by visiting BRENDA's BLOG next!


Saturday, October 21, 2017

Featured Paper Blog Hop - Beary Christmas!

So, I was supposed to be participating in
this awesome blog hop this morning,
but due to technical difficulties, my post
didn't go live when it was supposed to!
I'm sorry, and I hope it's okay that I still link
on to the last hopper and then direct you to the
beginning of the hop also so you can see
more beautiful "Beary Christmas" creations!

Welcome to our "Featured Paper Blog Hop"!
Today we are showcasing artwork that uses our
BEARY CHRISTMAS
paper pack, and features a variety of projects
created by talented Close to my Heart consultants.


If you are visiting from RAMONA's BLOG,
then you are on the right track.

So these are all of my creations using the
Workshops Your Way kit (item #G1137).
My goal was to try and stretch this kit to
make as many items as possible!

So I created the three workshop layouts,
as well as, the 8 cards (4 each of 2 designs,
but only the 2 designs are pictured here).
Then I used the left-over Picture My Life
cards to create 4 more pocket-style pages
and lastly, three more cards (using left-over
PML cards and stickers only, no stamping).

That's a lot of creativity from just one kit!!
Crazy, right?!!


I did add just a very little bit of colored cardstock
(black, fern, and pewter to add an extra pop of color
to some of my cards), some retired green ribbon
I had, 11 card bases and envelopes, and 4 pocket-style
memory protectors, that are not included in the kit.
I hope you are now inspired to try utilizing every
scrap of paper, every left-over sticker, and every single
embellishment included in your workshop kit(s)...
it's a fun challenge that I truly enjoyed!

Now you can start the blog hop from the
beginning by visiting CAROL's BLOG next!

Wednesday, August 16, 2017

Annual Inspirations New Product Blog Hop!

THANK YOU for stopping by to enjoy our
Annual Inspirations 2017
New Product Blog Hop!!

Today, 25 consultant artists are sharing artwork
they've created using NEW products
featured in the Annual Inspirations 2017 catalog
from Close to my Heart!


If you've just arrived here from KATHY's BLOG
then you are on the correct path.


One of the first stamp sets featured in the NEW
Annual Inspirations that I knew I just had to have is:
C1685 Inspire

Not only do I LOVE the pretty cursive font,
but each of the four sentiments are just awesome!!

In addition to C1685 Inspire,
I've also used the following list of supplies
to create this standard-size card:

D1741 Beautiful You stamp set
(use item# Z3384 to add 
the coordinating thin cuts)
Z3353 Basics Fundamentals paper packet
X5943 Enchantment cardstock (peacock)
Z3364 Basics Ribbon pack (gold ribbon)
Z3371 Gold Pearls (self-adhesive)
Z899 Black memento ink pad
Z2817 Crystal Blue stamp pad
Z2850 Fern stamp pad
Z2849 Peacock stamp pad
(1st and 2nd generation stamping)

Now you can continue on with the hop
and be inspired by more creative artwork
and ideas by visiting SHEILA's BLOG next.
Enjoy the hop!!

Sunday, April 16, 2017

Cardmaking Workshops Your Way Blog Hop!

THANK YOU for stopping by to enjoy our
Cardmaking WYW Blog Hop!

The Close to my Heart consultant's participating 
in this blog hop today are sharing their artwork 
created using any of the four different stamp sets 
purchased as part of the Cardmaking
Workshops Your Way kits!
(shown on pages 13, 23, 33, and 43 of the 
soon-to-be-retiring Seasonal Expressions 1 Catalog).

If you've just arrived here from
then you are on the correct path.

If you get lost along the way, you can find
a complete list of all of the participating
consultant blogs here on MELINDA's BLOG.

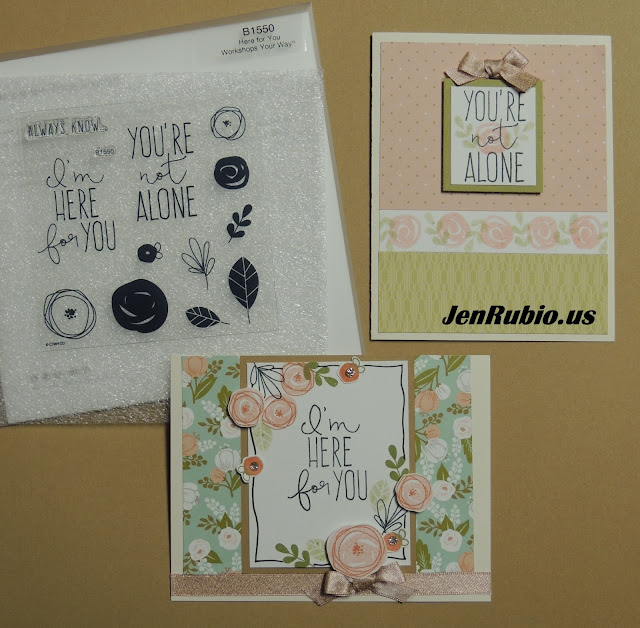
The cards I'm sharing today include a few standard-size cards I created using the Here For You stamp set from the Here For You kit (item #G1124) with the Hello Lovely papers.
Ink colors I used here (below) include Black, Fern, and Sorbet
(with both 2nd generation and a little 1st generation inking).

...and (above) here's another card (that I shared on my blog previously) that you might want to see also, if you haven't already! (you can use this link here to see the full list of ink colors used and tips/instructions how to create it yourself).

Now you can continue on with the hop,
and be inspired by more creativity
using one of our beautiful Cardmaking WYW kits, 
by visiting BRENDA's BLOG next!
Enjoy the hop!!

Sunday, November 27, 2016

Cricut Flower Market Blog Hop!

THANK YOU for stopping by to enjoy our
Cricut Flower Market Blog Hop!


Today, 23 consultant artists are sharing
artwork they've created using this, the 
newest Cricut cartridge/collection
only from Close to my Heart!

Just in time for our
CYBER MONDAY promotion...
When you spend $30 on retail-price product,
you can purchase any one of our Cricut collections
at 30% off!! The sale starts Monday, November 28th,
at midnight (MST) and 11pm (pacific).
Here's the link to shop with me:
www.StampwithJen.ctmh.com

If you've just arrived here from

KRISTA's BLOG
then you are on the correct path.


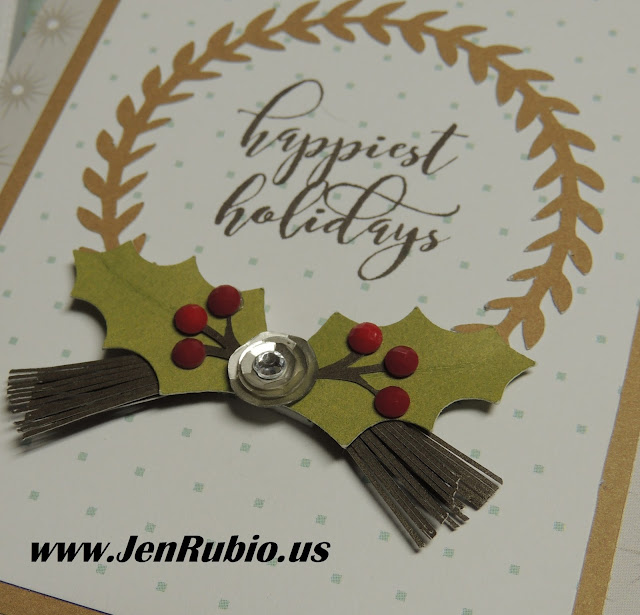
The standard-size card I created (above) features the Oh Deer! papers (X7214B) with Cocoa, Desert Sand, and Fern cardstocks. I especially love the look of the three silver sequins stacked on top of one another and finished off with a clear sparkle.
The wreath was cut at 2.75"
The holly, stems, and sprigs were cut at 1.5"

Now you can continue on with the hop,
and be inspired by more creativity
using Flower Market by visiting
CAT's BLOG next!
Enjoy the hop!!

Thursday, October 6, 2016

Spread the Love Operation Smile Blog Hop! (featuring the "True Love" stamp set - D1711)

THANK YOU for stopping by to enjoy our
Spread the Love
Operation Smile Blog Hop!

Today, 15 consultant artists are sharing
artwork they've created using this stamp set
available NOW through the end of July 2017
only from Close to my Heart!
When you purchase this stamp set 
(True Love - D1711) for $17.95,
a $7.00 donation will be given to
Operation Smile, our affiliated charity!
(Learn more at OperationSmile.org).

If you've just arrived here from

SHEILA's BLOG
then you are on the correct path.

I just adore this stamp set! It inspires so many creative possibilities, but I'll start by sharing just one card I've designed with it for now. This Standard-size card features the Swan Lake papers (X7212B). All images are stamped with a Black memento ink pad (Z899) and colored in with Shin Han Touch Twin Markers (Barely Beige for skin, Golden Yellow girls hair, Marigold boys hair, Turquoise Blue dress, Warm Grey 4 on the heart & boys shirt). SPECIAL TIP:  To achieve the "Peacock" color on the small balloon & boys shorts I simply colored them in with a Marine Blue marker first, then colored a second layer on top of that color with Peacock Green!...Super easy!!

Finally, I couldn't decide which side of the Poppy B&T duos paper I liked the best, so here's a view of the card (below) shown both ways. I love that it's so easy to simply flip our patterned papers over for another option whenever we want to change the design up just a little bit. The top card is perfect for giving in the Summer/Fall, while the bottom card looks more appropriate for Valentine's Day.

Now you can continue on with hop...
and be inspired by more creativity
using this stamp set by visiting
GINA's BLOG next!
Enjoy the hop!!
  

Thursday, September 15, 2016

Holiday Expressions New Product Blog Hop!

THANK YOU 
for stopping by to enjoy
our Holiday Expressions
New Product Blog Hop!

If you've just arrived here

from JACQUELIN's BLOG
then you are on the correct path.

Today, 25 consultant artists are sharing artwork
they've created using all-new products from our 
NEW Holiday Expressions Catalog!

Today, I'm sharing SIX
Harry Potter-themed cards I designed
using paper and embellishments
left-over after I created just the scrapbook 
pages using the Jeepers Creepers
Workshops Your Way Scrapbooking Kit 
(Item #G1110):
Start by cutting all of the layout pieces ONLY shown in the Jeepers Creepers WYW instruction guide (do NOT cut the darker-shaded card pieces labeled 4, 5, and 6!!). Then, using the scraps that are left over, you should have enough paper to cut pieces to create TWO of each card design shown here. The key is to cut each of the papers one sheet at a time (starting with Card #1 first, then Card #2, and so on). ALWAYS cut the smaller measurement first (that's how I got it to work out). Also, when you're cutting the smaller measurements first, make sure you are paying attention to which way the stripes and zig zags are going! If you keep the stripes pointing the same directions as my card samples show, you should have just enough paper. Make sure you cut the second (duplicate piece for each card) right away from the same strip you cut the first one, before moving on to cutting the next pieces.

In addition to 12 standard-size card bases and envelopes (item #X254), you will also need one sheet of Black 12x12 cardstock and some clear Sparkles ((item #Z3274). You will also need some very minimal scraps of Black, Lemon, and Tangerine cardstocks to make your Cricut Artistry cuts. The only stamped and colored-in image is the sorting hat on Card #2, so unlike most of the creations I share on my blog, these cards require very minimal stamping!

Leave your email address in the comments below (or email me!) if you want to request that I send you a copy of the full instructions (an MSword document). This file will also include a page that you will print two of (in black and white) on White Daisy cardstock to create your sentiments for each card. Enjoy!!

CARD #1 (above)
Sentiment – cropped to 3” x 2.75” tall
Pansy CS – 3.25” x 3”
Eyeballs B&T – 1.5” x 5.5”
Lagoon stripe B&T – 2.75” x 5.5”
5.5” of black stripe washi tape
Cut lightbulb using Cricut Artistry (p. 33)
1.5 “ on Canary and Tangerine cardstocks.
Mount lightbulb with 3-D foam tape.

CARD #2 (above)
Sentiment – cropped to 2.75” x  3.75” tall
Pansy CS – 3” x 4”
Lightning Bolt B&T – 4” x 5.25”
Black cardstock – 4.25” x 5.5”
Stamp sorting hat from “Purr-fect Halloween” set (S1608)
with Black Memento ink on White Daisy CS scrap.
Color with Warm Grey 4, Warm Grey 7, and 
Colorless Blender 0 markers, and cut it out.
Mount sorting hat with 3-D foam tape.

CARD #3 (above)
Sentiment – cropped to 1.5” x 3” wide
Black CS – 1.75” x 3.25”
Lightning Bolt B&T – 1.5” x 5.5”
Tangerine stripe B&T – 2.75” x 5.5”
Polka Dot Zip Strip – 5.5
(adhere and layer on top of the stripe B&T)
Cut the glasses using Cricut Artistry (p.22)
1" on Black cardstock, adhere w/ fine glue pen.

CARD #4 (above)
Sentiment – cropped to 1.5” x 2.25” wide
Black CS – 1.75” x 2.5”
Zig Zag B&T – 4” x 5.25”
Lagoon stripe B&T – 2.25” x 3” and .75” x 3”
Cloud & Moon Zip Strip – 3” cut from left side.

CARD #5 (above)
Sentiment – cropped to 2.5” x 3” tall
Black CS – 2.75” x 3.25”
Tangerine stripe B&T – 1.5” x 4.25”
Lagoon stripe B&T – 3” x 4.25”
Pansy CS - .75” x 3” (wrapped with stripe washi tape)
4.25” of willow washi tape
Tangerine CS heart cut w/ smallest of Hearts thin cuts.

CARD #6 (above)
Sentiment – cropped to 1.5” x 3”
Black CS – 1.75” x 3.25”
Sentiment outlined w/ fine black pen (hand-drawn)
Zig Zag B&T – 4” x 5.25”
Tangerine stripe B&T - .75” x 3.5”
Tangerine CS heart cut w/smallest of Hearts thin cuts.

Now you can continue on with the hop
and be inspired by more creativity
using more all-new Holiday
Expressions products by visiting
Enjoy the hop!!